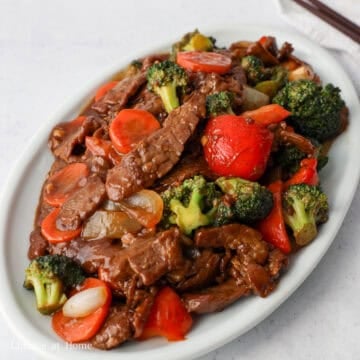
This easy Mongolian chicken recipe takes just 25 minutes and simple ingredients to make tonight. It tosses crispy, bite-sized chicken in a sticky, sweet soy glaze. Skip the takeout fees for a fast dinner that your whole family will love.

I first tried this Chinese-American restaurant-style dish at a tiny mall food court. The sweet, sticky sauce was so addictive that I ran home to recreate my own recipe for Mongolian chicken. My first kitchen tests turned out too salty and soggy. I fixed this by using cornstarch for a crisp crunch and finding a perfect 2:1:1 ratio of hoisin sauce to soy sauce and brown sugar.

Why My Recipe Works
- Cornstarch creates crunch. A light dust of cornstarch makes the chicken extra crispy without using a heavy batter.
- Thighs stay juicy. After kitchen-testing both cuts, I recommend boneless chicken thighs as they stay incredibly juicy and don't dry out.
- Batch frying prevents sogginess. Cooking the meat in small groups keeps the oil hot so the chicken stays crisp in the sauce.
Ingredients & Substitutes
The exact ingredient measurements are listed in the recipe card at the bottom of this page.

- Chicken Thighs: Boneless, skinless thighs for best juiciness. Sub: Skinless chicken breasts. Cook to 160°F and let carryover cooking bring the internal temperature to 165°F.
- Cornstarch (for coating protein): Coats chicken for a crisp texture. Sub: Potato starch. Avoid tapioca or arrowroot starch.
- Neutral Oil: Use avocado, peanut, vegetable, canola, or sunflower oil. Avoid olive oil or any low-smoke-point oils.
- Garlic: Adds aromatic flavor. Sub: Jarred minced garlic.
- Red Chili Pepper: Adds spice and color to the sauce and used for garnishing.
- Ginger: Adds sharp flavor and cuts any gamey meat taste. Sub: ¼ teaspoon ground ginger.
- Hoisin Sauce: Adds a sweet molasses flavor. Do not sub with oyster sauce!
- Regular Soy Sauce: Adds salt and umami to the sauce. I prefer Lee Kum Kee, Pearl River Bridge, or Kikkoman. Subs: Low-sodium or light soy sauce.
- Brown Sugar: To balance salinity and add a molasses flavor. I prefer using light brown sugar but dark brown sugar works too.
- Toasted Sesame Oil: Adds a nutty aroma. I prefer Kadoya or Maruhon, but other brands work too. Avoid untoasted sesame oil.
- Cornstarch (for sauce): Thickens the sauce. Subs: Potato starch or tapioca starch.
- Cold Water: A neutral liquid base for the sauce.
- Green Onion: For garnishing, aroma, and color.
Note: Most Asian ingredients are typically found at Asian grocery stores, or you can check online.
Instructions
Below are step-by-step instructions on how to make Mongolian chicken:

- Make the slurry: In a small bowl, whisk together 1 tablespoon cornstarch and ½ cup (125 ml) cold water until fully dissolved. Set aside.

- Cube the chicken: Cut chicken thighs into uniform 1.5-inch cubes. Do not pat dry, as the moisture is needed for the next step.

- Coat in cornstarch: Transfer the chicken to a large bowl and add cornstarch. Toss until evenly coated, adding more if needed. Set aside.

- Fry in batches: Heat vegetable oil in a large pan over medium-high heat. Working in batches, fry the chicken in a single layer until crispy, cooked through, and golden, about 5-7 minutes. Transfer to a wire rack to drain. Reserve 2 teaspoon of oil in the pan and discard the rest.

- Build the sauce: Reduce heat to medium. Stir-fry ginger, garlic, and half of the red chilies for 10 seconds. Add hoisin sauce, soy sauce, brown sugar, and sesame oil. Stir the cornstarch slurry again, then pour it in. Stir to combine and simmer until the sauce thickens.

- Sauce and serve: Once the sauce has thickened, add the chicken and toss to coat evenly. Remove from heat, garnish with remaining red chilies and green onions, and serve immediately.
Expert Tips
- Cut uniform chicken cubes. Make every piece the same size. This keeps small bits from drying out while larger pieces finish cooking.
- Press starch into the meat. Use your hands to push the chicken into the cornstarch. This forms rugged edges that hold the heavy sauce.
- Drop coated meat in quickly. Cook the chicken within two minutes of dusting. Waiting lets juices soak through the starch and make paste.
- Use a heavy-bottomed pan and heat your oil to a steady 350°F. Heavy pans stop temperature drops when cold meat hits the hot oil.
- Give each piece breathing room. Never crowd the pan. Frying in small groups lets steam escape so the chicken crisps instead of steams.
Variations
- Mild: Swap the red chili with two tablespoons of finely diced red bell pepper.
- Gluten-free: Use tamari or coconut aminos instead of soy sauce. Make sure your hoisin sauce label says gluten-free.
- Vegetarian version: Swap the chicken for cubed extra-firm tofu. Press the tofu dry with a towel before coating it
Pairing Suggestions
This crispy Mongolian chicken stir-fry pairs well with:
- Starters: Crispy Crab Rangoon or a comforting bowl of Egg Drop Soup.
- Grains: Fluffy white jasmine rice or brown rice to soak up the extra sauce.
- Veggies: Garlic Green Beans or steamed broccoli for a fresh, vibrant crunch.
Storage & Reheating
- Fridge: Keep in an airtight container up to 3 days.
- Freezer: Keep in a freezer bag up to 2 months. Thaw overnight.
- Best Practice: Store chicken and sauce separately to prevent sogginess.
- If Stored Together: Air fry at 350°F for 8 minutes, or bake at 400°F for 12 minutes.
- If Stored Separately: Air fry chicken at 350°F for 5 minutes or bake at 400°F for 8 minutes. Warm sauce in a skillet over low heat with a splash of water, then toss.
FAQ
Yes, you can cook this dish ahead of time. Please follow our specific storage and reheating instructions listed in the section above.
Yes! Generously spray your air fryer basket with oil and arrange the cornstarch-coated chicken in a single layer with space between each piece. Spritz the top of the chicken heavily with oil, ensuring no dry, white flour spots remain. Air fry at 400°F for 10-14 minutes until golden and crispy. While it cooks, simmer your sauce on the stove, then toss the crispy chicken into the thickened glaze.
Yes! Broccoli florets, snap peas, bell peppers, and carrots pair beautifully with this dish. To keep your chicken perfectly crispy, stir-fry the vegetables separately first until tender-crisp, remove them from the pan, and then toss them back into the sauce at the very end with the cooked chicken.
📖 Recipe

Easy 25-min. Mongolian Chicken (Shallow Fried)
Ingredients
- 1 lb skinless boneless chicken thighs
- ¼ cup cornstarch or potato starch, add more if needed
- ⅓ cup vegetable oil or any neutral oil
- 2 garlic cloves minced
- 2 red chili pepper sliced, divided
- 5 slices ginger
- 4 tablespoon hoisin sauce
- 2 tablespoon regular soy sauce or light soy sauce
- 2 tablespoon brown sugar
- 2 teaspoon sesame oil toasted kind
- 1 green onion finely chopped (optional garnish)
Cornstarch Slurry
- 1 tablespoon cornstarch or potato starch
- ½ cup water cold
Instructions
- In a small bowl, whisk together 1 tablespoon cornstarch and ½ cup (125 ml) cold water until fully dissolved to make your cornstarch slurry. Set aside.
- Cut chicken thighs into uniform 1.5-inch cubes. Do not pat dry, as the moisture is needed for the next step.
- Transfer the chicken to a large bowl and add cornstarch. Toss until evenly coated, adding more if needed. Set aside.
- Heat vegetable oil in a large pan over medium-high heat. Working in batches, fry the chicken in a single layer until crispy, cooked through, and golden, about 5-7 minutes. Transfer to a wire rack to drain. Reserve 2 teaspoon (10 ml) of oil in the pan and discard the rest.
- Reduce heat to medium. Stir-fry ginger, garlic, and half of the red chilies for 10 seconds. Add hoisin sauce, soy sauce, brown sugar, and sesame oil. Stir the cornstarch slurry again, then pour it in. Stir to combine and simmer until the sauce thickens.
- Add the chicken and toss to coat evenly. Remove from heat, garnish with the remaining red chilies and green onions, and serve immediately.
Mr Clint Herbst
Very good recipe. Spot on.
Christie Lai
Thank you so much making my recipe and for leaving this review! Glad you enjoyed it.
Patty C
Amazing good! Followed recipe, thanks for sharing.
Christie Lai
Fantastic! Thank you so much for making my recipe and for leaving a positive review here, Patty! So glad you enjoyed it!
Roy Goodacre
Love this recipe. Have made it several times and this evening I'm making it for my two grandchildren who enjoyed it last time I made it for them.
Christie Lai
Thank you so much for making my recipe and for leaving a positive review, Roy! So happy you and your grandchildren enjoyed it 🙂
Bob
Loved it., But being into heat I added a quarter cup of chili garlic sauce.
Christie Lai
So happy to read this! Glad you enjoyed it with the extra heat!
Sabrina
This dish turned out great!!
Christie Lai
Thrilled to read this, Sabrina! Thank you so much for making my recipe and for sharing your 5-star review!
Lynn
First time varying from my usual Asian dishes. Loved this. My husband said it was great and there were no leftovers. Definitely will make it again.
Christie Lai
Thank you so much for the positive feedback and for making my recipe! Glad you and your husband loved it so much!
Jules
Can you use chicken tenderloins instead of chicken thighs?
Christie Lai
Yes, that will work well too!